Equipment
I am currently using two types of cameras, Wildlife cameras (out in the forest, must visit to collect the camera memory), Wifi Security Camera (located within 100 feet of the house in edge of the woods).
Security Cameras: Currently I am using Blink Outdoor. The batteries last a long time. The images are not bad. Here is an example video. Some animals appear to see (and sometimes avoid) a tiny red visible light. The camera also makes tiny auto focus noises. The camera is not “no glo” like the Wildlife camera but I disable the spotlight feature. Previously I used Arlo Q. The images were higher quality and the app was better, but the infrared does not reach very far and the camera was an indoor camera that needed power (so I put them outdoors with rain protection and a battery). Most Wifi cameras require a subscription (images stored in the cloud). The Arlo Q did not but they may now be charging (pretty universal). It is really fun getting instant notification that you have action on a camera (via phone App). I wish that Blink had PC web app.
Wildlife cameras: Most of my videos were created with Meidase S3 Pro Trail Camera or the GardePro A3S (they appear to be variations of the same camera manufactured under different brand names). GardePro has Sony camera components. The audio sometimes has artifacts. The Meidase has better audio but may have slightly inferior night video. Honestly I cannot make up my mind which I prefer. Although I am satisfied with these cameras I have noted quality inconsistency between cameras (image quality variation).
I use these memory cards – SanDisk Extreme Pro XDSC UHS-1 128G Memory Card with a Lexar SD Card reader.
Camera settings (see list at bottom of page)
Image Editing Software – I am currently using Wondershare Filmora.
Selecting a location
- Learn to read the signs. Look for footprints, scat, den locations, foraging locations, safe locations, migration routes, attractive locations (newly fallen tree – they notice something that changes in the environment and investigate).
- Vegetation can trigger the camera (especially when it is windy).
- Some animals can see the camera (even no-glo) if they are moving straight towards it and it is at eye level. This includes:
- Raccoons – are curious but not afraid and will damage the camera
- Deer – are curious but not afraid and will sniff and blow on the lens (might get dirty).
- Coyotes – are afraid of it – try to locate where they are not walking straight towards the camera or they will avoid the area (bad to frighten them in their territory).
- Bears – They are curious and will damage the camera.
- Otters – they are curious and may be a bit cautious if they notice it. It is better to locate it such that they are not moving towards the camera.
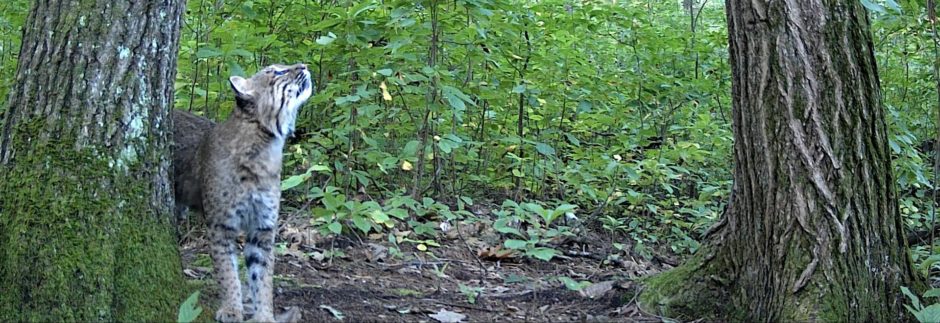
- Bobcats – do not normally notice but if they do they may be wary of it (not curious).
Mounting the camera (tree, stand, angle to subject, arrival angle of subject, triggering angle, avoidance of moisture, stray vegetation waving or glowing) <to be filled in soon>
Workflow
Visit the camera, remove the SD card and replace it with another one. I used to label the cards with camera number (so I had two cards for each camera and I kept swapping them). However, later I decided that this was inefficient.
For each card, first review the images. If a small subset of them are interesting, then just copy those to your storage area. If a high number of them are interesting, then copy them all. I always store the saved images by YYYYMMDD/CAMX_YYYYMMDD/*.mp4.
Minimize how much you become part of the environment (but it is unavoidable)
You will become part of the environment, but you can try to minimize your impact. Don’t step on fragile plant life, don’t leave your scent in locations that will be noticed by animal subjects, don’t tread in the same location each time you visit the camera (thus creating a beaten path). Don’t visit the camera during the high wildlife activity times (I avoid dawn and dusk).
Seasons (related to photography what is different about each season)
Winter – No ticks. Less foliage. Drier conditions. Bright snow. Snow on the camera (can also melt and turn into ice on the camera). Animal tracks. Seasonal animal behavior changes.
Spring – Ticks, high water, new leaves appearing (in the way of the camera), baby plant shoots that must not be stepped on. Seasonal animal behavior changes.
Summer – Thick foliage, bugs on camera, high humidity (camera might not dry as well), mosquitos, moderate ticks (less of a problem). Seasonal animal behavior changes.
Fall – Falling leaves (can trigger camera), fall ticks. Seasonal animal behavior changes.
Camera settings (that I use for my cameras)
- Mode – motion detection (icon looks like deer with antlers)
- Photo or Video – set to video (it is possible to capture both, but I just grab video frames)
- Photo Quality – not using photo mode but I leave it at 4M
- Photo Burst – not using photo mode but I leave it at 1P
- Video Quality – 1080 (don’t set it higher, I think quality is reduced) – I may revisit this.
- Video Length: daytime 30s, nighttime 30s
- Video Sound – enabled
- Video Format – MP4
- Frame rate – I use 30fps.
- Overexposure Suppression – OK (I have never tried disabling it)
- Detection delay – 0 seconds (even with this it takes fraction of a section to detect)
- PIR Sensitivity – High (an article about this)
- Side Motion Sensors – enabled (I enabled to increase the chance of detecting approaching animal quickly)
- Motion test – leave at default. I played with it a little but deciding that waiting to see what I get was more useful.
- Timelapse interval – I leave at default. I did not play with this feature (for photos). I think it would be fun to try sometime. Once I saw some successive videos that showed a mushroom growing really quickly. It would have been fun to use it for that.
- Time Zone – I set this.
- Date & Time – I set this. Occasionally I need to fix it (I think if battery dies -rare)
- Date Format – I set this
- Time format – I put on 12h
- Camera name – I enable this and set it. I use a number, 0001,0002,0003,0004, etc
- Info strip – I enable this. Sometimes animals that are barely in the view (almost too low) get blocked by this but there would also be cases that were even lower. Is valuable to have this record.
- loop recording – I leave it disabled. Never used this feature.
- Operation hours – I never used this feature. You could use it if something is causing the camera to trigger frequently during the day when interesting animal detection is unlikely. I don’t use it because now and then I get great daytime shots of animals in areas far away from people.
- Password – I never bother with this.
- Language – I don’t remember setting it, I think English must be default.
- Format SD Card – I use this frequently if I visit the camera and see nothing but junk, I format the card again while it is still strapped to the tree. You will need to do this when you first use a new camera memory.
- Factory Reset – I have never needed to use this (never had a camera get messed up)
- Version – I just look at this if I want to see if I am using the latest version of the software.
You may see minor differences depending on the camera firmware version.
Regarding Infrared Flash: I don’t have that option on the camera that I just looked at. I would set it at high and then back it down if the images look too bright in the location that you chose (that would be too bright for close up shots). My wifi cameras have this setting and I leave it on high initially because I am more likely to see animals that are farther away. For close up I back it down.